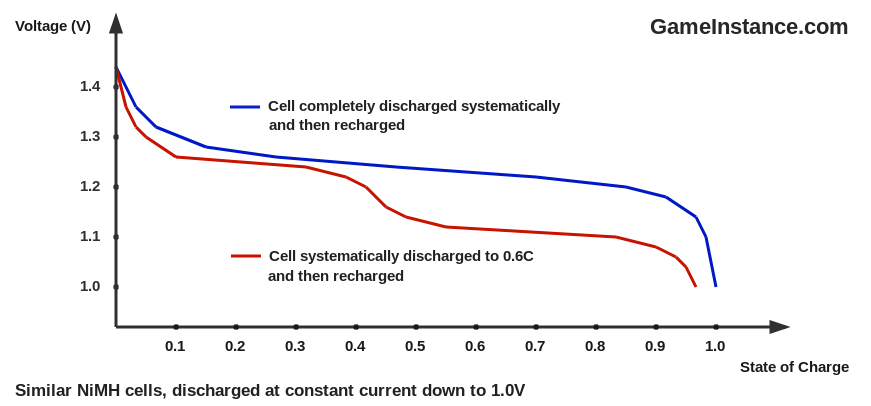
Discharging a NiMH rechargeable battery, as counterintuitive as it may seem, is often necessary before recharging it. Due to the infamous memory effect that NiMH chemistry exhibits, the apparent capacity falls greatly below the rated one, even after few use cycles. It manifests as a sudden voltage drop - normally associated with the completely discharged state - for cells that are regularly partially discharged and then completely recharged. This article proposes a simple DIY Arduino device capable of detecting partially discharged NiMH cells and discharge them without affecting their lifespan.
The memory effect is oftentimes associated with cells used in groups for portable electronics that - for good reasons - signal low battery earlier. It also appears if you're having the habit of recharging them before they're depleted, just because you need them to be ready for the next day, every day.
Otherwise put it's like being sent to bed at 5:00PM every day for a week or so. By the next week you'll start feeling weary as of 4:30PM, unable to perform until the end of the day. Getting back to normal would be as simple as forcing oneself to stay alert until bed time for few days. That's pretty much the same with NiMH batteries.
What is
the bed time for a NiMH rechargeable battery? The answer is simple: when they're completely discharged. Knowing that is a bit more complicated though as one needs a way of determining the cell's state of charge. That in itself is a completely different story and involves energy book-keeping, a system watching closely the current put and drawn from the battery along with its voltage and operating temperature. However, for the purpose of this article the completely discharged state will be considered at 1.0V, a generally accepted threshold.
The hardware
consists of an Arduino Pro Mini board powered by Atmega 328 or 168, a 2W 1.8 Ohm resistor and one N-Channel MOSFET. Some extra resistors will be needed, mostly for MCU's pin protection.
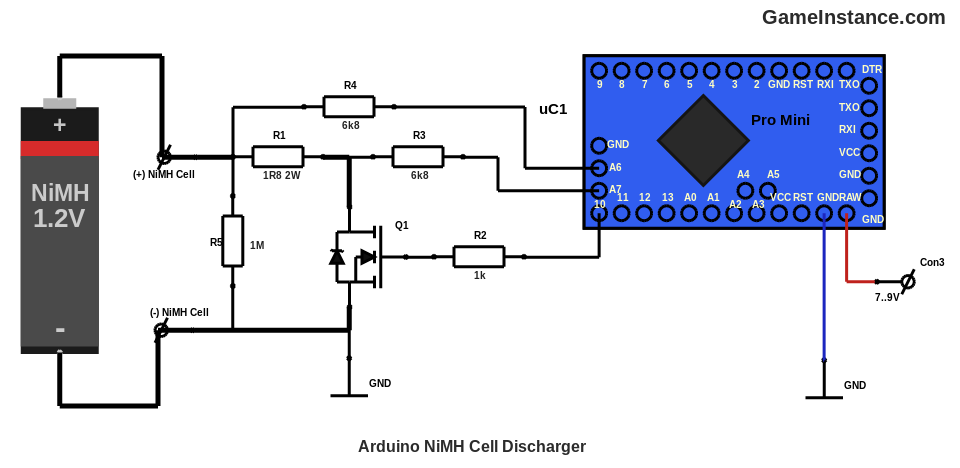
Arduino pin 10 will be driving the MOSFET directly via the current limiting resistor R2. When open, the MOSFET will connect the battery to the discharge R1 resistor. Consequently, a current in excess of 800 mA will be expected both through the resistor and the power transistor. The voltage drop on the R1 can be measured and from it the discharge current can be determined for logging purposes. R5 is of a sufficiently large value, 1 MOhm in this case, enough to pull down the A6 and A7 pins when MOSFET is off without further discharging a NiMH cell at the end of the process. However, do not forget to remove the battery when it's done.
Warning:
One may feel the urge of scaling up the discharge system to accommodate two or more cells in series at once. Do NOT do that! As two cells are never alike, some will discharge faster than others to unacceptable limits. Worse, in a mix of cells with various charge levels, the weaker ones can go in reverse - often associated with the end of that cell.
Now, the Q1's rated 17.5 mOhm will not be attained because its gate will be charged at 5V tops. It will have around 0.2 Ohms that, in series with the R1, will give a 2 Ohm discharge resistance. The exact MOSFET's RDS could be calculated using the voltage measured by A7 and the determined current flowing through R1. That would be helpful in obtaining the battery's internal resistance.
BOM:
MCU1 - 1x Arduino Pro Mini featuring the Atmega328 or Atmega168
Q1 - 1x IRFZ44N RDSon=17.5mOhm
R1 - 1x 1.8 Ohm 2W power resistors
R2 - 1x 1 kOhm resistor
R3, 4 - 2x 6.8 kOhm resistor
R5 - 1x 1 MOhm resistor
The software
relies on a simple automate with five states. In the first one the device waits for a battery to be connected. If it is detected as a NiMH cell, with voltages between 1.0V and 1.45V, it moves on the second that turns on the discharger. It then unconditionally passes on to the third one in which the battery voltage is constantly monitored until it drops slightly below 1.0V. It them stops the discharger and remains in the last state until the battery is removed.
static const byte VBAT_PROBE = A6;
static const byte VSHUNT_PROBE = A7;
static const byte DISCHARGE_PIN = 10;
static const byte LED_PIN = 13;

static const unsigned int ADC_RESOLUTION_DEFAULT = 1024;

static const float V_BAT_MIN = 1.0; // volts
static const float V_BAT_MAX = 1.45; // volts
static const float VCC = 5.00; // volts
static const float SHUNT_RESISTANCE = 1.8; // ohms

byte state = 0;
double v_bat = 0.0, v_shunt = 0.0;
bool LEDon = false;

double GetVoltage(unsigned int value) {
  //
  return (double) value / (ADC_RESOLUTION_DEFAULT - 1) * VCC;
}

void setup() {
  //
  digitalWrite(DISCHARGE_PIN, LOW);
  Serial.begin(9600);
}

void loop() {
  //
  if (state == 0) {
    // waiting for battery
    v_bat = GetVoltage(analogRead(VBAT_PROBE));
    if (v_bat > V_BAT_MIN) {
      // a battery was connected
      if (v_bat > V_BAT_MAX) {
        // voltage too high,
        // consistent with an alkaline cell
        // or a well charged NiMH - not needing discharge
        Serial.println("Invalid cell. Must be a partially discharged 1.2V NiMH cell.");
        state = 4;
      } else {
        // voltage consistent with a 1.2V NiMH cell
        state = 1;
        Serial.print("1.2V NiMH cell connected. Vbat = ");
        Serial.print(v_bat, 6);
        Serial.println(" V");
      }
    } else {
      // nothing connected yet
      Serial.print("No battery connected. Vbat = ");
      Serial.print(v_bat, 6);
      Serial.println(" V");
      delay(2000);
    }
  }
  if (state == 1) {
    // starting the discharge
    digitalWrite(DISCHARGE_PIN, HIGH);
    digitalWrite(LED_PIN, HIGH);
    Serial.println("Discharge started.");
    delay(500);
    state = 2;
  }
  if (state == 2) {
    //
    v_bat = GetVoltage(analogRead(VBAT_PROBE));
    if (v_bat < V_BAT_MIN) {
      // cell no longer needing discharge
      Serial.print("Discharge complete. Vbat=");
      Serial.print(v_bat);
      Serial.println(" V");
      state = 3;
    } else {
      // cell not yet discharged
      v_shunt = GetVoltage(analogRead(VSHUNT_PROBE));
      Serial.print(millis());
      Serial.print(" Vbat=");
      Serial.print(v_bat, 6);
      Serial.print(" V Idischarge=");
      Serial.print((v_bat - v_shunt) / SHUNT_RESISTANCE, 6);
      Serial.println(" A");
      delay(2000);
    }
  }
  if (state == 3) {
    // ending the discharge
    digitalWrite(DISCHARGE_PIN, LOW);
    digitalWrite(LED_PIN, LOW);
    delay(500);
    state = 4;
  }
  if (state == 4) {
    // waiting for the battery to be removed
    v_bat = GetVoltage(analogRead(VBAT_PROBE));
    if (v_bat < V_BAT_MIN / 2) {
      // battery removed
      state = 0;
    } else {
      // battery not yet removed
      if (LEDon) {
        //
        LEDon = false;
        digitalWrite(LED_PIN, LOW);
      } else {
        //
        LEDon = true;
        digitalWrite(LED_PIN, HIGH);
      }
      delay(1000);
    }
  }
}
For the up-to-date version of the code, please check-out the GitHub repository.
Before you go
here are the main points of this article. Some battery powered electronic devices will stop discharging the battery pack earlier to avoid damaging weaker cells. As a consequence the pack will form a memory and its effect limits the apparent per-cell capacity. This can be counteracted by discharging each NiMH cell to approximately 1V and then recharging them back. The proposed solution can be easily implemented and uses an Arduino micro-controller board, a variable current consumer and a power N-MOSFET. The system detects if the cell is of NiMH chemistry and discharges it until the minimum voltage limit is reached.